


 Printer Friendly Version
QuickBooks uses payroll items to calculate and track compensation, additions, deductions, and company expenses that result from paying employees. You need to set up your payroll items only once, which in turn makes processing payroll as easy as reporting the time an employee works.
Adding or Editing Payroll Items
If you are new to QuickBooks payroll, I recommend that you begin by using the Payroll Setup. During the Payroll Setup you were provided with two options for creating your list of payroll items:
- Typical New Employer Setup—QuickBooks adds the most common payroll items for you.
- Custom Setup—Select this option if you need to set up sick time, vacation time, or insurance benefits.
If you have been using QuickBooks for payroll, you will no longer see these two options. The fields required to be completed will differ depending on the type of payroll item. To add or edit a deduction payroll item, follow these steps:
- From the menu bar select Lists, Payroll Item List.
- Select New from the Payroll Item menu (or use the Ctrl+N keyboard shortcut). You can also right click a payroll item and choose Edit Payroll Item if you need to make changes.
- Select one of the following methods:
- EZ Setup—Opens the Payroll Setup using standard settings, recommended for most users. To learn more about using this option, see “Using the Payroll Setup Interview,” p. 432. of Laura Madeira’s QuickBooks 2013 In Depth.
- Custom Setup—Offers a more traditional approach to setting up payroll items, recommended for expert users.
- If you selected Custom Setup in step 3, the Add New Payroll Item dialog box displays.
- Select a payroll item type, such as Deduction (shown below) and then click Next.
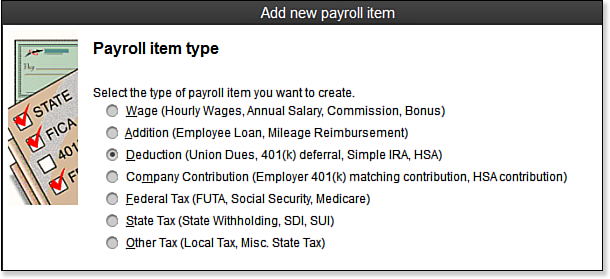
Select the appropriate payroll item type to be created.
- Type a name for the payroll item. This name will display on paychecks and in reports. Selecting the Track Expenses by Job might be suitable for most company contribution and addition items and would include costs to this payroll item in Job Profitability reports. Click Next.
- On the Agency for Employee-Paid Liability screen, enter the following:
- From your vendor list, select the agency or vendor to which you pay the liability. If necessary, click Add New to create a new vendor record. Skip this field if the deduction is not being paid to anyone. For instance, the image below shows how to establish a cell phone reimbursement item.
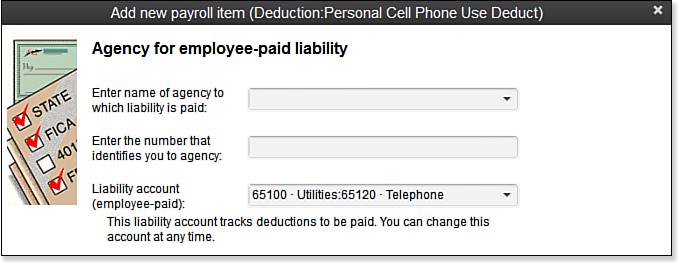
Payroll deductions can recover a portion of a business paid expense.
- If your liability vendor assigns an account number to your business, enter it into the account number field.
- Make a selection from your chart of accounts. In this example, the Telephone Expense account is selected. If the deduction payroll item is used to recover a business paid expense from employees, select the corresponding expense account. Normally you would accept the default account of Payroll Liabilities. If you followed the previously recommended process for creating detailed payroll accounts on your chart of accounts, select the appropriate subaccount. Click Next.
- From your vendor list, select the agency or vendor to which you pay the liability. If necessary, click Add New to create a new vendor record. Skip this field if the deduction is not being paid to anyone. For instance, the image below shows how to establish a cell phone reimbursement item.
- Select the appropriate Tax Tracking Type, or select None if none of the types applies, as shown in the image below. This choice is important to properly set up your payroll items. If you are unsure, ask your accountant for advice. Click Next.
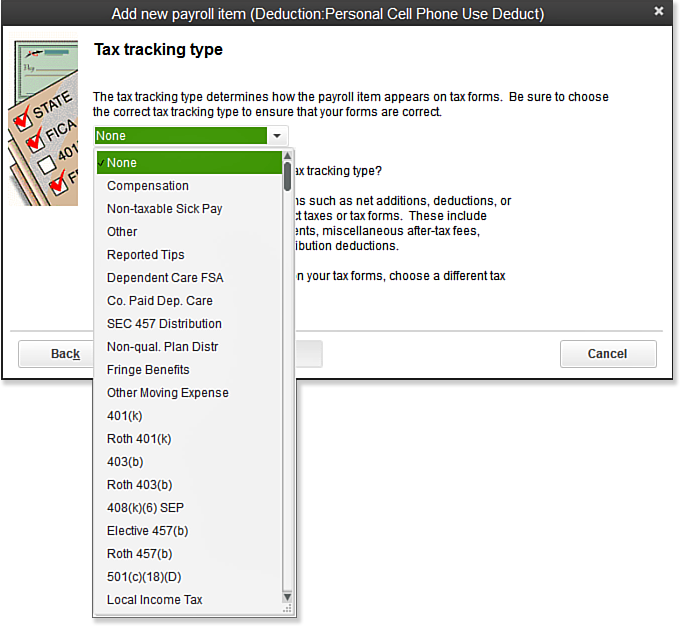
Carefully reviewing the Tax Tracking Types can help with accurately setting up payroll.
–>Note: You can always edit the settings for a specific payroll item. However, some changes will affect only future payroll checks and not those recorded prior to making the change.
- The Taxes screen displays. In most cases, you will not need to modify the settings in this screen. Click Default to return to the original settings. Click Next.
- The Calculate Based on Quantity screen offers the following choices:
- Calculate This Item Based on Quantity
- Calculate This Item Based on Hours
- Neither
- After making a selection, click Next.
- Select to calculate the deduction from Gross Pay or Net Pay. If you are unsure, ask your accountant, because the correct selection will depend on the item being set up. Click Next.
- Enter a Default Rate, optional Default Upper Limit, and specify whether the limit is annually reset. If the rate or upper limit differs for each employee, do not enter amounts here. The rate and limit can be added individually to each employee’s record. Click Finish.
- Click OK after reading the Schedule Payments message. For more information, see “Creating or Editing a Payroll Schedule,” p. 455 of Laura Madeira’s QuickBooks 2013 In Depth.
You have now properly set up your payroll items! In the early stages of your payroll use, you should carefully inspect your setup to avoid any mistakes with payroll payments.
From Laura Madeira’s QuickBooks 2013 In Depth