


 Printer Friendly Version
For Accounting Professionals, how often have you reviewed your client’s QuickBooks data to see multiple transactions posted to the incorrect general ledger account? As an accountant, you will probably not want to spend the time needed to correct each individual transaction. A preferred method might be to create a journal entry transaction, which in effect “reclassifies” the amount out of the incorrect account and into the correct account.
With Client Data Review (CDR) in QuickBooks Accountant 2013 or Enterprise Solutions Accountant 13.0, you can use the Reclassify Transactions feature. You access this tool from the Accountant Center, Accountant menu, or from an opened review using CDR.
From the Accounts panel on the left side of the Reclassify Transactions dialog box, you can do the following:
- Accept or change the defaulted date range. These dates control the transactions that will display for reclassifying.
- Accept or change the defaulted basis. This basis defaults from the setting found on the Company Information dialog box (select Company, Company Information from the menu bar).
- From the View drop-down list, choose to view Expense, Profit & Loss, or Balance Sheet accounts.
After selecting a chart of account listing on the left in the Accounts panel, you can filter the transactions displayed on the right in the Transactions panel with these options:
- From the Name drop-down list, leave the default of All, which is all active list items. Or, select a specific list item from Customers, Employees, Vendor, or Other Names list.
- From the Show Transactions drop-down list, the default of Non-Item-Based (can be reclassified) is selected. Other options include Item-Based (can change only the class) or All to show all transactions.
Here’s a tip from Laura Madeira’s QuickBooks 2013 In Depth:
When you select Include Inactive Names from the Name drop-down list in the Reclassify Transactions task, you will not affect the transactions displayed. Instead, the list now includes any inactive list items for you to select from.
If you select an inactive name from the list, you will get a message from QuickBooks asking if you would like to use it once, make it active, or cancel. More information about working with lists can be found in Chapter 4, “Understanding QuickBooks Lists.”
After reviewing the detailed transactions, you might find that a certain vendor had all transactions assigned to the wrong expense account. For example, in the image below, vendor Cal Gas & Electric had the transactions assigned to the Utilities:Water expense account. This was a mistake made on each of the checks all year. The proper account should have been the Utilities:Gas and Electric expense account.
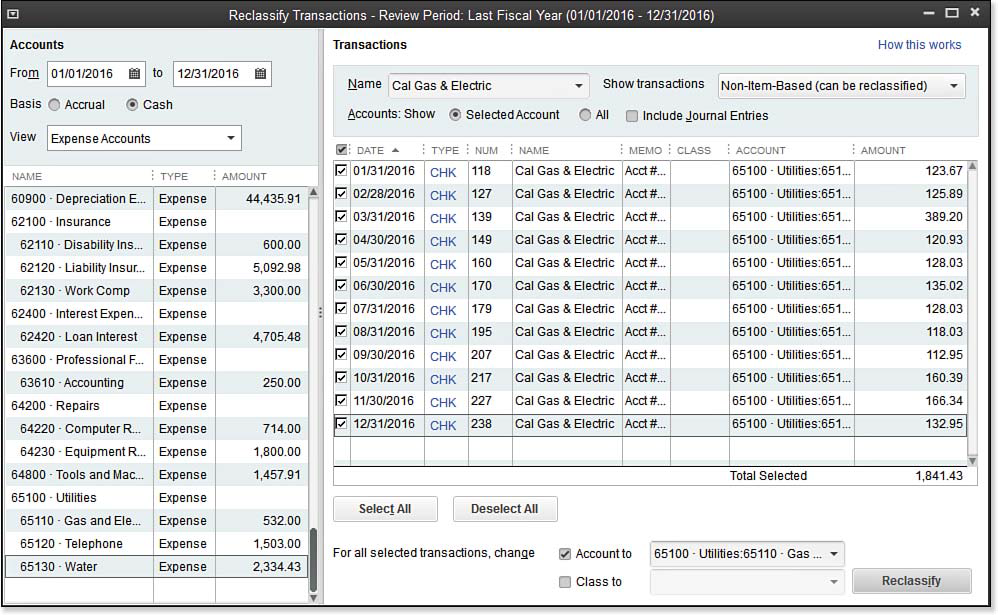
Use the Reclassify Transactions dialog box to correct the account assigned to multiple transactions.
Prior to using CDR, accounting professionals would have created a journal entry reducing expenses recorded to the Utilities:Water account and increasing expenses for Utilities:Gas and Electric account. With this CDR feature, reclassifying the transactions is made easy by following these steps:
- With the Reclassify Transactions dialog box displayed as shown above, select a date range for which you want to review and possibly reclassify transactions.
- Accept the default Basis, or change if needed.
- From the View drop-down list, select the account types you want to review for reclassification.
- With a chart of accounts item selected in the Accounts panel on the left, you will see displayed to the right transactions assigned to that account for the selected date range and basis.
- (Optional) From the Name drop-down list, select a specific vendor, customer, employee, or other name for which you want to filter the displayed transactions.
- The Show Transactions drop-down list will default to display only those transactions you can reclassify with this feature. (Optional) Select to show Item-Based transactions. For item based transactions, you can reclassify only the Class assigned. Or, select All to see both.
- (Optional) Select the Include Journal Entries check-box.
- In step 5, if you selected a specific name from the drop-down list, you might want to select in the Accounts: Show All. CDR will display all transactions for the Name selected for All accounts (not just the account selected on the left).
- As you make changes to the filters in Reclassify Transactions, the displayed transactions refresh automatically.
- (Optional) Choose Select All or Deselect All when choosing which transactions to reclassify.
- For all selected transactions, select the proper general ledger account from the Account To drop-down list and optionally assign a new Class, if desired.
- Review your selections and click the Reclassify button. The window will refresh, displaying the changes made to the transactions.
- Continue reviewing all the accounts until your review is complete.
- Press the Esc key on your keyboard or click the X on the top right of the Reclassify Transactions dialog box when you are ready to close.
A word of caution: Only non-item-based transactions can be reclassified with the CDR tool. If you want to edit the account assigned on item-based transactions, you need to edit the individual item in the original transaction. For more information about working with QuickBooks items, please refer to Chapter 4 of Laura Madeira’s QuickBooks 2013 In Depth.
From Laura Madeira’s QuickBooks 2013 In Depth