


 Printer Friendly Version
When you offer to pay employees an advance on their earnings, you are creating a loan payment check. If this is a loan to be paid back to the company, follow these steps:
- From the menu bar, select Employees, Pay Employees, Unscheduled Payroll. The Enter Payroll Information dialog box opens.
- Place a checkmark next to the employee you are creating the loan check for.
- QuickBooks might warn that a paycheck for that period already exists. Click Continue if you want to create the loan payment check. You are returned to the Enter Payroll Information dialog box.
- To modify the check to be an employee loan check, click the Open Paycheck Detail button.
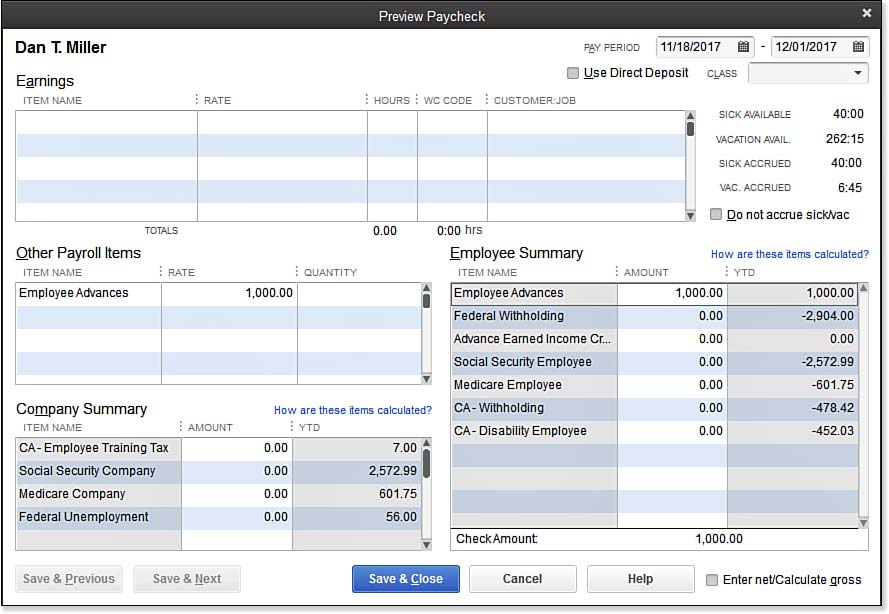
- In the Preview Paycheck dialog box, remove any amounts from the Earnings box (if you expect to be repaid this amount, the amount is not considered taxable earnings).
- In the Other Payroll Items drop-down list, select the Employee Advances (in this example it was an Addition type payroll item) as shown in the image below, and skip to step 15. If you do not have an employee advance payroll item, you can easily create one right from the Preview Paycheck dialog box. In the Other Payroll Items box drop-down list, click Add New.
Use an Addition type payroll item when preparing a nontaxable loan (advance) to
an employee. - In the Add New Payroll Item dialog box, select the button for the Addition type and click Next.
- The Add New Payroll Item (Addition) dialog box opens. Name the item Employee Advance (if displayed, do not select the Track Expenses by Job box). Click Next.
- In the Expense Account drop-down list, select Employee Advances, Other Current Asset account. You can also scroll to the top of this list and click Add New in this dialog box to create the Other Current Asset account if needed. Click Next.
- On the Tax Tracking Type screen, select None (at the top of the list) and click Next.
- Do not place a checkmark next to any of the Taxes options. Click Next.
- The Calculate Based on Quantity screen opens. Leave the default of Neither selected and click Next.
- On the Gross vs. Net screen, leave the default of Gross. This setting has no impact because you are setting it up with a tax tracking type of None. Click Next.
- The Default Rate and Limit screen opens. Leave it blank because you define the limit amounts individually for each employee. Click Finish to close the Add New Payroll Item (Addition) dialog box.
- You are returned to the Preview Paycheck dialog box. From the Other Payroll Items box, in the Item Name column, select the Employee Advance payroll addition item from the drop-down list. Enter the dollar amount of the loan you are providing the employee in the Rate column. QuickBooks creates a payroll advance check without deducting any payroll taxes (as shown above). Note that you do not need to enter anything in the Quantity column.
QuickBooks now has on record a loan paid to the employee. If you have defined payment terms with the employee, you need to edit the employee’s record, so that on future payroll checks the agreed-to amount will be deducted.
–> A word of caution: Carefully consider what option you choose when selecting the Tax Tracking type for a new payroll item or editing an existing payroll item. The selection you choose here affects how QuickBooks taxes or doesn’t tax the payroll item on paychecks and how QuickBooks handles reporting the payroll item on forms, such as the W-2 form given to employees at the end of a calendar year. When you select each Tax Tracking type, QuickBooks provides detailed information about how it will be treated for tax calculations and form preparation. Be sure to take the time to read these. If you are unsure of the proper tax tracking type, consult your accounting professional.