


 Printer Friendly Version
Fragmentation refers to any condition where data is not recorded in a logical continuous order. QuickBooks is subject to two different kinds of fragmentation—disk fragmentation and database fragmentation.
An example of disk fragmentation is when a QuickBooks invoice is recorded on your hard drive adjacent to a picture of your pets. Although it seems ridiculous to anyone who ever worked as a file clerk, this is the normal function of the Windows operating system. Your QuickBooks company file can be fragmented on your computer’s disk drive just like any of your other files. This occurs when the operating system cannot create or insert new information into the file in one logically contiguous space. Because the Windows operating system does not restrict the writing of data to only contiguous areas of your disk drive, as the total amount of data on your disk drive increases, fragmentation also increases.
Because of fragmentation, the hard drive’s disk head must repeatedly move back and forth over the disk when reading and writing various parts of the file. The more the disk head must move from one area to another, the less efficient the disk drive is, lengthening the response time of QuickBooks trying to find your data.
To correct this type of fragmentation, we must force our Windows computer to rewrite all the parts of files to contiguous space on the hard drive. This is called defragmentation, and QuickBooks users should routinely run the Disk Defragmentation tool included with Windows software. After running this tool, QuickBooks users should see an increase in the speed of file access and data retrieval. If your disk drive is less than 10% full, run defragmentation three or four times per year. If your disk drive is running at 25% to 30% of capacity, perform a monthly defragmentation. If your disk drive is at 50% or more of capacity or you have a QuickBooks Company file in excess of 50MB, you might need to run defragmentation once a week.
Defragmenting Your Windows 7 Computer
Choosing to defragment your computer can lead to a more responsive data file, providing quicker retrieval of data for reporting.
- In the lower-left corner of your screen, click the Windows Orb or Start button.
- Click All Programs.
- Open the Accessories folder.
- Open the Systems Tools folder.
- Click Disk Defragmenter to open the utility displayed in the image below:
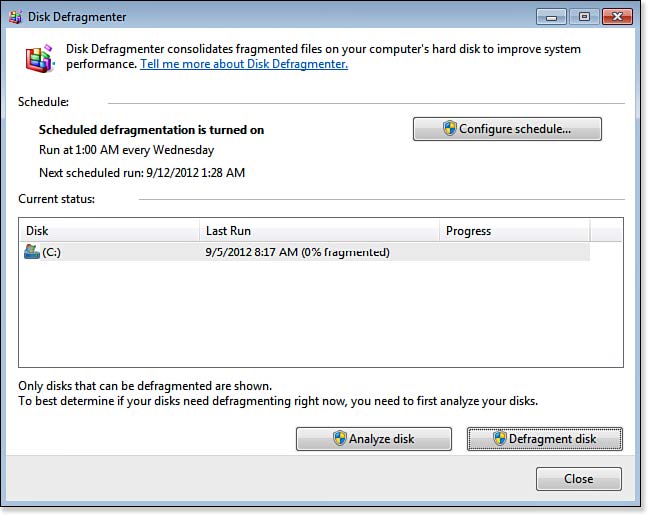
Run the defragmenter tool on your computer often.
- Select the drive you want to defragment.
- Click Analyze. A dialog box displays after the disk is analyzed, detailing if you need to perform the defragmentation.
- To defragment the selected drive(s), click the Defragment Disk button. You can monitor the process in the Current status area (under the Progress column). After the process is complete, the results will be displayed.
- To display more detailed information, click View Report.
- To close the Disk Defragmenter, click Close.