


 Printer Friendly Version
When you are ready to purchase materials or services for your business, you need to create a vendor. You might already have a head start on adding vendors to your file, if you used the Adding Contacts feature available with the Express Start QuickBooks setup. However, another less frequently used list in QuickBooks is worth mentioning here: the Other Names list. One occasion when you might choose to add a payee to the Other Names list is when you are recording a one-time purchase. Later, if you begin using the vendor regularly, you have a one-time option to remove the payee from the Other Names list and add it to your Vendor list.
If your company will be using the Enter Bills process, you have to use a payee from the vendor list; the vendor bill transaction does not allow you to use an Other Names list item in the payee field.
–> Here’s a tip from From Laura Madeira’s QuickBooks 2013 In Depth: Would you like to efficiently create new vendor records? Start with entering data in the Company Name field. When you move your cursor out of the Company Name field, QuickBooks also automatically populates the Vendor Name, Billed From, and Print on Check As field (found on the Payment Settings tab). The Vendor Name field in QuickBooks is a “look-up” name; this field also controls how your vendors are automatically sorted in the Vendor Center. If you prefer to use a different vendor look-up name, be sure to enter the proper vendor name in the Print On Check As field on the Payment Settings tab.
Adding a New Vendor
To practice adding a new vendor record, open the sample data file. If you are working in your own file, use these instructions to begin entering the vendors you purchase goods and services from:
- Click the Vendors button on the Home page. Alternatively, from the menu bar select Vendors, Vendor Center.
- If the New Feature highlights display, read the information provided. To dismiss these message in the future, click the X in the What’s New dialog box. You can re-enable help from the menu bar by selecting Help, What’s New.
- In the New Vendor drop-down list in the upper-left corner of the Vendor Center, select New Vendor.
- The New Vendor dialog box displays (as shown below). In the Vendor Name field, type ABC Subcontractor. It is important to mention that no two names from any of the lists in QuickBooks can be the same.
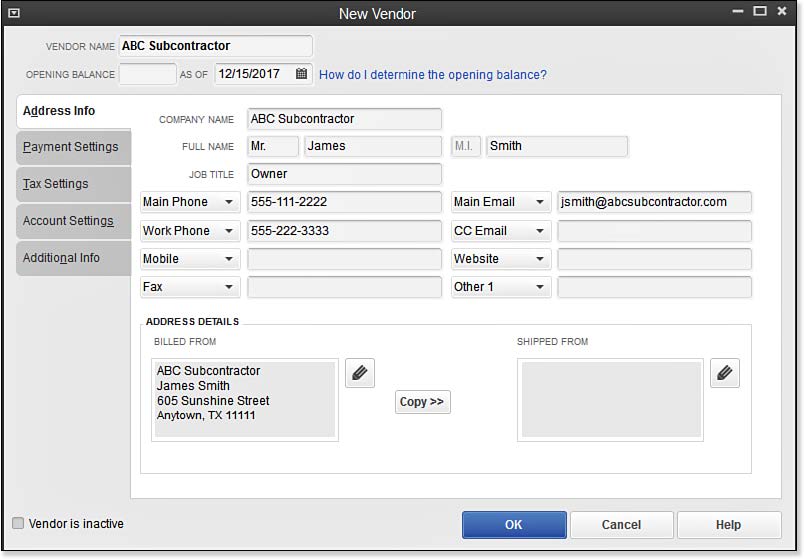
Completing the contact information for your vendor is good practice for your record keeping.
- Leave the Opening Balance field blank. If you are a new business, you will later enter a vendor bill to increase the balance owed to the vendor instead of entering an Opening Balance amount in the New Vendor record. The As Of (date) field does not have any effect in your QuickBooks file, if a dollar value was not entered in the Opening Balance field.
- On the Address Info tab, consider completing the Salutation, First Name, and Last Name fields so you have the option to send letters to your vendors in the future.
- Complete any remaining fields you deem applicable, such as contact information and address.
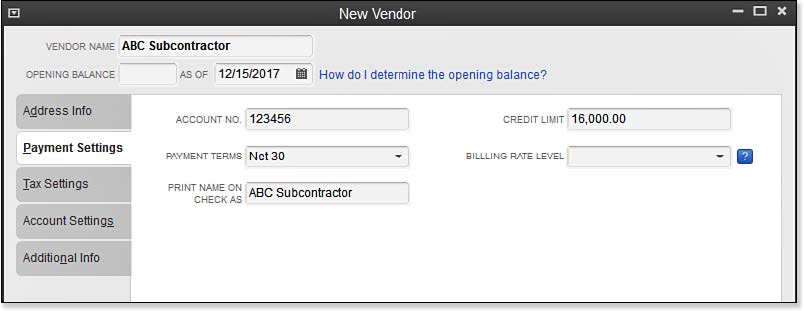
- Click the Payment Settings tab, as shown below. In the Account No. field, enter the account number your vendor has assigned to you, if applicable. This account number can optionally be printed on the memo line of a vendor bill payment check.
Completing the contact information for your vendor is good practice for your record keeping.
- Select the appropriate payment terms, such as Net 30 days, your vendor has assigned to your account. If the specific term needed is not displayed, select Add New to add additional payment terms to the list.
- (Optional) Complete the Print Name on Check As field. This field is necessary only if the printed name on the check differs from the Vendor Name field.
- If you are using QuickBooks Premier, Accountant, or Enterprise, you have the option of selecting a Billing Rate Level for your vendor. Billing rates allow you to mark up billable time you will later add to a customer invoice.
- Click the Tax Settings tab to enter the Vendor’s Tax ID and assign the vendor as eligible for 1099 reporting. Note that if you do not have this information handy when you first create the vendor, you can add this information at a later date without any loss of tracking the details.
- Click the Account Settings. Select the Repairs:Building Repairs expense account. You can assign up to three different accounts that will display automatically when you create a new transaction using this vendor as the payee. If you also download transactions from your bank or credit card, click the link to review the information provided about how Account Prefill works with Online Banking.
- Click the Additional Info tab. From the drop-down Vendor Type menu, select from the provided types or select Add New to create a new vendor type. Use the Vendor Type field to categorize your vendors, which you can then use to filter your vendor and transaction reports.
- If you have created a Custom Field, complete the value for that field. Custom fields allow you to track supplemental information about your vendors. Click the Define Fields button to add or remove custom fields.
- At any time, you can select or deselect the Vendor Is Inactive checkbox. In such cases, the vendor still appears on reports, but will not appear in most drop-down lists you use for creating new transactions.
- Click OK to save your changes and close the New Vendor dialog box, or click Cancel to discard your work.
–> A word of caution: QuickBooks does not keep a time stamp on revisions made to your vendors’ contact information. After you make a change, all previous records reflect the change to the address or contact information. However, changes to the Account Prefill selection affect only the newly created transactions.
–> Here’s a another useful tip:
Are you using QuickBooks Enterprise? With this edition, you can choose from more robust settings when you use Custom Fields. Custom fields are assigned to items. For example, you might use custom fields when your inventory items have multiple sizes or colors. With Enterprise, you can have up to 15 custom fields. These custom fields are then assigned to items; they can be selected on transactions and can be reported on.
QuickBooks Enterprise adds more robust custom field functionality by permitting you to assign the custom field to be used for specific transaction types. With each custom field you can specify the characteristics of the data, such as a text, date, number field with or without decimals, or offer a multichoice list for the user to select when entering an item. These are just a few of the available data field types that can be assigned.
Now that you have created a new vendor in the sample file, you are prepared to create a list of your own vendors. Return to the Vendor Center anytime you need to update a vendor’s information.