


 Printer Friendly Version
To practice adding a new service item, open the sample data file. If you are working in your own file, use these instructions to begin creating your own service items:
- From the menu bar, select Lists, Item List to open the Item List dialog box.
- Select New from the Item drop-down list. Optionally, use the keyboard shortcut Ctrl+N.
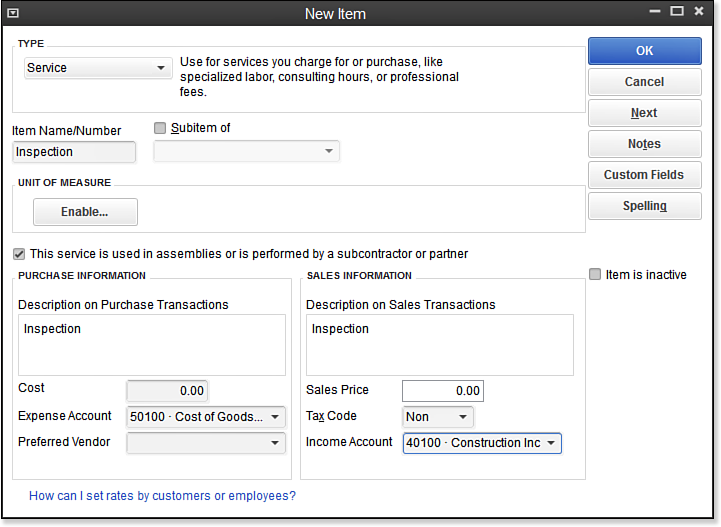
- From the Type drop-down list select Service.
- In the Item Name/Number field, type Inspection.
- Select the This Service Is Used in Assemblies or Is Performed by a Subcontractor or Partner checkbox, as shown below. This makes the item “two-sided,” assigning both an expense account, when used with a purchase transaction, and an income account, when used with a sales transaction.
Items are used on customer sales transactions and purchase transactions.
- In the Purchase Information text box, type Inspection.
- Enter a default Cost. This amount will default on a purchase transaction, but can also be changed at the time of entry. If you do not want a default cost for the item, leave the box blank.
- In the Expense Account field, select the appropriate account. For this example, we will use the Cost of Goods Sold account because the item is directly related to our Customers or Jobs.
- In the Preferred Vendor field, assign a vendor or leave blank. When a preferred vendor is assigned, QuickBooks will pre-fill that vendor name on a purchase order transaction when the item is selected.
- Accept the default description in the Sales Information text box, or type a unique description. This description will default on your sales transactions for this item. Optionally, enter a default Sales Price. This amount will default on sales transactions, but can be changed at the time of entry.
- From the Tax Code drop-down list, select Non. In your own file, select the tax code, choosing Tax if the item is subject to sales tax or Non for nontaxable services. Check with your state’s taxing authority, if you have any questions about an item or service you sell being taxable or not.
- From the Income Account drop-down list, for this practice, select the Subcontracted Labor Income account.
- If you are finished adding items, click OK to save and exit the New Item dialog box. If you want to continue adding items, click Next to add another item.
From Laura Madeira’s QuickBooks 2013 In Depth